Creating an Invoice
Cloud POS lets you create fiscally signed invoices in a guided, step-by-step process. Each invoice is signed with your PFX certificate and reported to the tax authority automatically.
Before You Start
Make sure you have:
At least one active certificate uploaded (see POS Manager)
An active Cloud POS subscription
Step-by-Step Guide
Step 1: Select Your POS
Go to POS → Create Invoice in the sidebar
The page shows your currently selected certificate with its location, UID, and taxpayer name
If you have multiple certificates, click Change POS to select a different one
Choose the certificate you want to use for signing

When a certificate is selected, Cloud POS automatically connects to the V-SDC and retrieves the current tax rates for that location.
Step 2: Add Invoice Items
Click Add Item

Fill in the item details:
GTIN — Global Trade Item Number / product barcode (optional). See Product Management for details
Name — Item description
Quantity — Number of units (supports decimal quantities for items sold by weight or measure)
Unit Price — Price per unit (minimum two decimal places)
Select the tax category from the available options — these are received from the V-SDC and include the label letter and rate (e.g., "VAT (A) - 15%"). See Tax Rates
Click Add to include the item
Repeat for each item on the invoice. You can see all added items listed as cards, with the running subtotal and total at the bottom.

To change an item, click the edit icon on its card
To remove an item, click the delete icon — this is the void function, allowing you to remove any selected item before the invoice is issued
Note: You must add at least one item before you can fiscalize the invoice.
Step 3: Choose Payment Method
The Payment section shows the total and how the customer is paying. By default the full amount is allocated to a single payment method.
Select the Payment Method from the dropdown — Cash, Card, Check, Wire Transfer, Voucher, Mobile Money, or Other. See Payment Types
The total updates automatically to match the invoice items
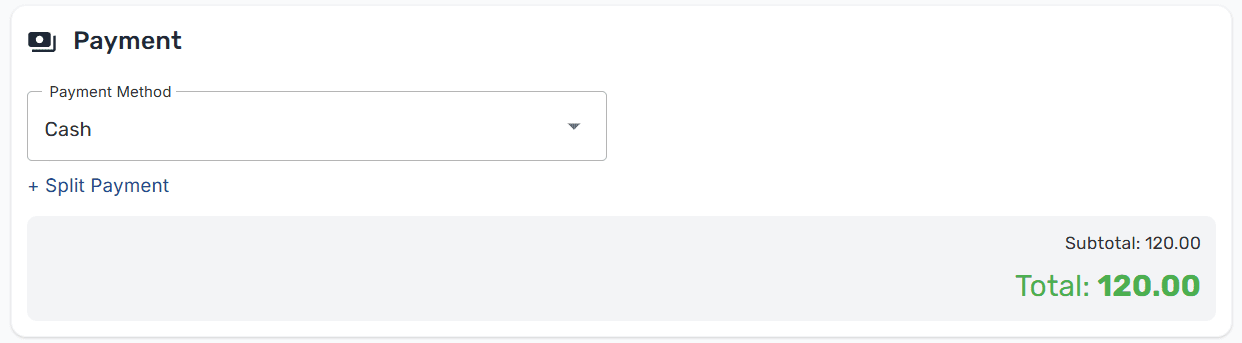
Splitting a Payment Across Multiple Methods
When a customer pays with more than one method (for example, part cash and part card), use split payment:
Click + Split Payment below the Payment Method dropdown
In the dialog, the first row is pre-filled with the invoice total
Click Add payment method to add another row — pick a payment type and an amount
As you edit an amount, the last row rebalances automatically so the allocated total matches the invoice total
The Remaining value must reach
0.00(shown in green) for the split to be validClick Save to apply the split
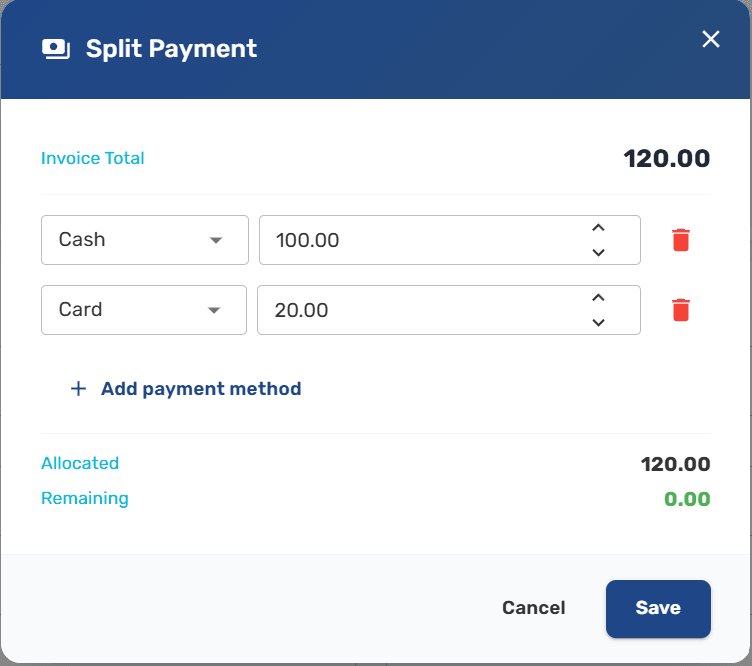
After saving, the Payment section shows each allocated method and amount, and the Payment Method dropdown is locked to Multiple (N methods). Click the edit icon next to the total or the Edit payment split link to adjust the split again.
Note: You can't fiscalize until the split is balanced. If the payment total doesn't match the invoice total, a warning appears and the Fiscalize button is disabled.
Step 4: Configure Invoice Settings
Expand the Invoice Settings panel to review or change:
Setting | Options | Notes |
|---|---|---|
Invoice Type | Normal, Advance, Training, Copy, Proforma | Most sales use Normal. See Invoice Types for details |
Transaction Type | Sale, Refund | Use Refund for returns |
Reference Number | Text field | Required for Refunds and Copies — enter the original invoice number in format RequestedBy-SignedBy-OrdinalNumber. Optional when linking a Normal Sale to a prior Advance or Proforma invoice |
Buyer Tax ID | Text field | The buyer's TIN — mandatory for B2B transactions, optional otherwise |
Buyer Cost Center | Text field | Optional internal code the buyer gave you (e.g. |
Cashier ID/Name | Text field | Identifies who processed the sale |

Tip: Use Training invoice type to practice without creating real fiscal records. Training invoices are not reported to the tax authority.
Step 5: Fiscalize
Review your invoice — check the type, payment, items, and total
Click Fiscalize
A confirmation dialog appears showing a summary:
Invoice type and transaction type
Payment breakdown (one row per payment method when split)
Total amount
Number of items

Confirm to submit the invoice for fiscal signing
The invoice data is sent to the V-SDC, which signs it and returns the fiscal result. The POS cannot issue an invoice if it is not connected to the V-SDC.
After Fiscalization
Once the invoice is signed, you'll see a success screen with:
Field | Description |
|---|---|
Invoice Number | The fiscal invoice number assigned by the SDC (format: RequestedBy-SignedBy-OrdinalNumber) |
Invoice Counter | A sequential counter generated by the V-SDC |
SDC DateTime | The official timestamp from the SDC, used for tax calculation and reporting |
Verification URL | A link anyone can use to verify the invoice |
QR Code | Scannable code linking to the verification URL |
Signed By | The certificate that signed the invoice |

From here you can:
Print the receipt — See Printing an Invoice
Create another invoice — Start a new sale
View in invoice history — Go to POS Invoices
Next Steps
Print an invoice — Print a formatted fiscal receipt
Copy, refund, or cancel — Post-sale invoice operations
Manage invoices — View your full invoice history
Product management — Manage your product catalog
Invoice types — Learn about all invoice and transaction type combinations